Thursday, March 20, 2014

Lights! iPhones! Jewelry! Part II

In this blog we are going to share some of the time and energy-saving tips we learned during our Lights! iPhones! Jewelry! photo shoot to start getting our jewelry up on our Etsy store: http://www.etsy.com/shop/PartnersInCharms. In that blog we talked about what equipment we used and how we set it up. If you haven’t had a chance to read it yet, you can check it out here: http://partnersincharms.blogspot.com/2014/03/lights-iphones-jewelry-part-1.html

Our tips…

Make sure to sort your jewelry into types before shooting begins. This way you can take all your earring photos, then your rings, etc. It saves a ton of time because you don’t have to switch your set-ups as often.

We sorted our jewelry into trays and holders by type: rings, necklaces,
bracelets and earrings.
Keep a set of basic tools handy in case a piece needs to be tweaked – like tightening up a loop or adjusting a jump ring.

Have extra hangtags and earring cards available in case you have to replace a label after shooting.

Hang and earring tags, pen and basic jewelry tools were kept close at hand.
Since we didn’t have any museum clay available we used a small piece of polymer clay to help with getting great shots of our rings.

Stef found that a pop can was a handy way of getting a nice smooth line on necklaces, especially those with ball chain.

Our treats became tools when Stef discovered a great way to smooth out
jewelry chain with an empty pop can!
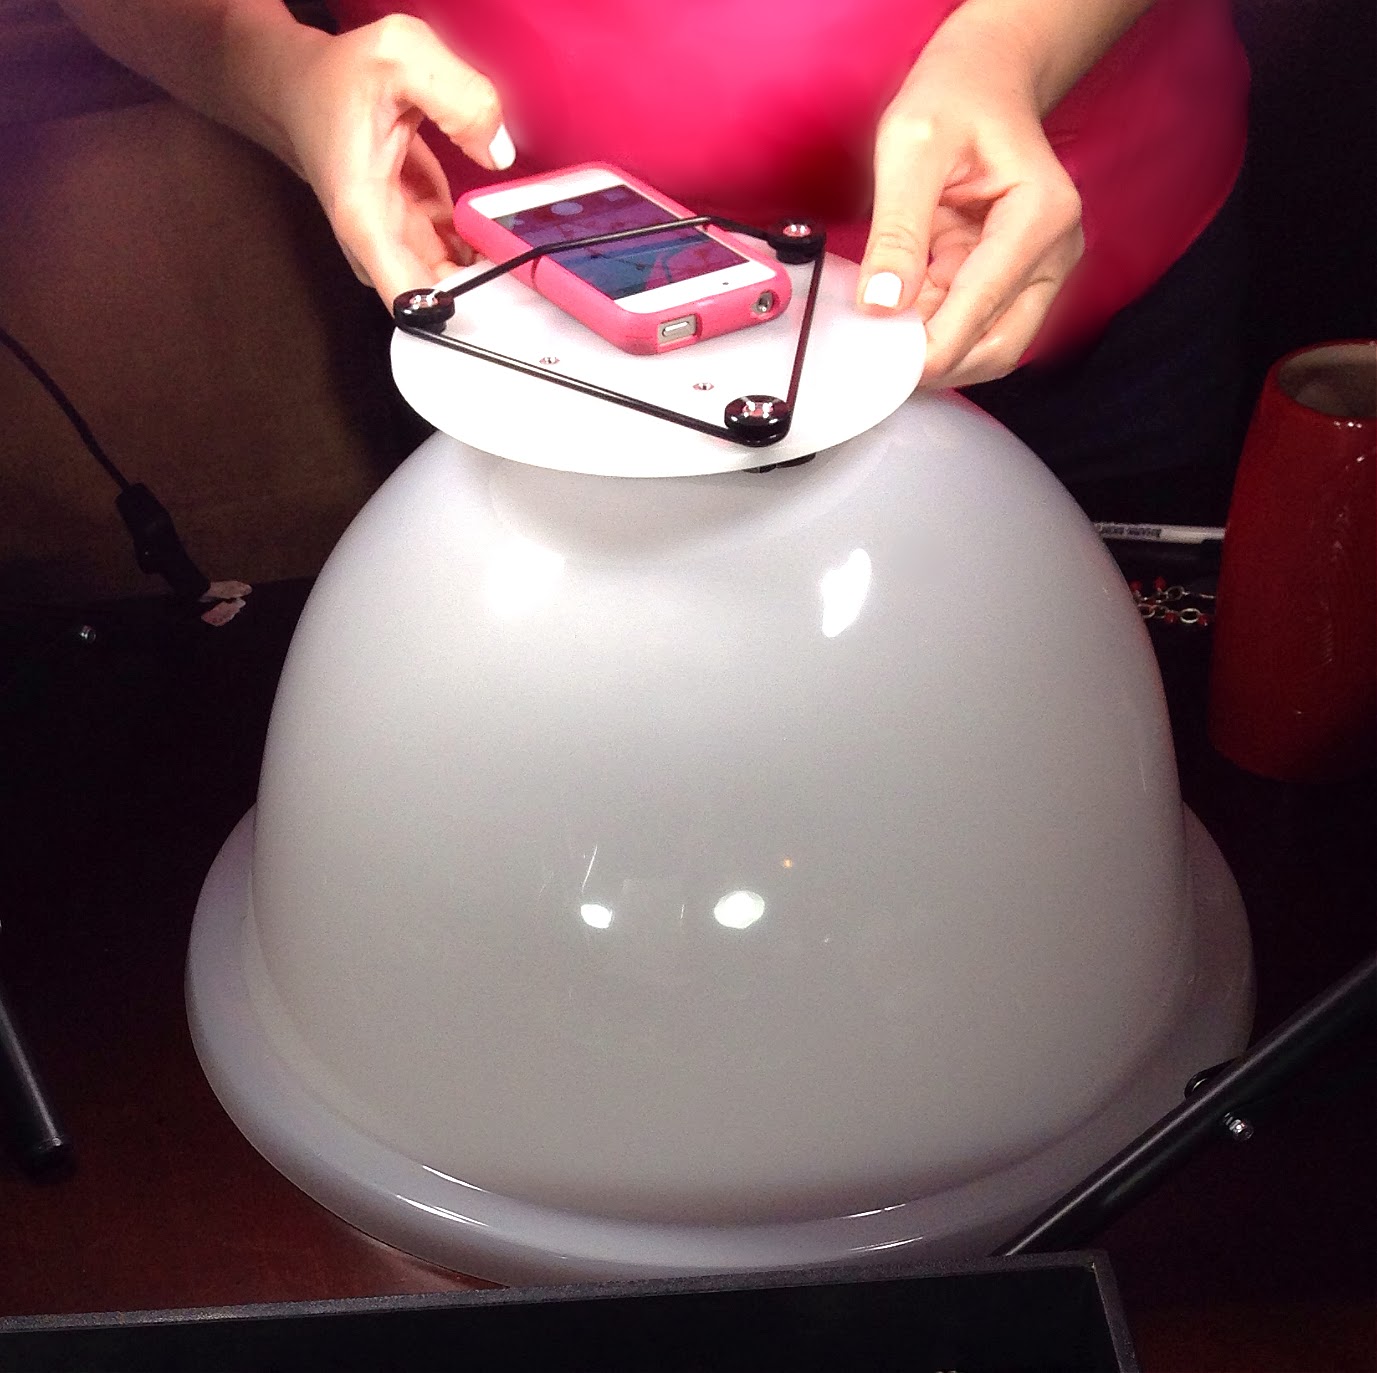
Watch what you wear. We found that the bright pink top that Stef was wearing reflected in some of the images, so wear white or a light neutral color.

You may want to have some props ready at hand such as velvet or leather necks or small clear bottles that you can rest a bracelet against.

To get an angled shot, we just left the iPhone on the Cloud Dome and then picked up and angled the whole thing to get some interesting images.

By keeping the iPhone attached to the Nimbus Cloud, Stef was able to get some great shots of our beautiful rings that are always a challenge to photograph just right!
Keep a flat area of space clear where you are taking the pictures so you can put your Cloud Dome down as you change out your pieces.

Make sure your lighting is right. Take the time to adjust it to the best possible, because this will save time when you are editing photos later. If you are taking photos over a long period of time, you may need to adjust your lighting as the day goes on if you are relying on any natural daylight.

Periodically clean the surface that you are photographing on. It is just amazing how dust, fibers, cat hairs, etc. seem to come out of nowhere and you don’t catch it until you go to editing and have 50 pictures with one silly little bit of dust right in the middle of your image.

One thing that we didn’t do that would have made photo editing easier was to put a white tablecloth down on the table so if shots caught some of the background, it wouldn’t be the dark brown table.

We found that once the camera phone was attached to the Cloud Dome, the rubber bands that held it on made it very difficult to access parts of the screen to focus the image. We solved this problem by using a stylus. It doesn’t have to be anything fancy, but something with a fine tip to get in there close to the rubber bands.

Using a stylus pen to get even greater precision in our photos.
Treats!!! We are NOT photographers so this is not our favorite task in getting our jewelry out in the marketplace, so we made sure we had plenty of healthy (ha!) snacks to keep us energized!

Keep the box your Cloud Dome comes in. It has a great foam lining that kept the cats entertained and away from “helping” us while we took shots!


Bella and Yoshi both found the Cloud Dome box to be a super comfortable place
to curl up!

To sum up – we had a blast and time seemed to fly as we worked together. The Cloud Dome equipment with our iPhones really made taking that many images possible. You can check out the Cloud Dome equipment at http://www.clouddome.com/.

Here are some of our completed pictures. Be sure to check out our Etsy shop at http://www.etsy.com/shop/PartnersInCharms! Lots of wonderful jewelry items to choose from!


We want to thank Cindy Lichfield, Cloud Dome inventor, for all of her fabulous support! You can contact her at: http://www.clouddome.com/store/contactus.shtml

Happy Beading!

Kathy and Stef


Tuesday, March 11, 2014

Lights! iPhones! Jewelry! (Part 1)

After deciding it was time to get all of our jewelry--well some of our jewelry at least--up in our Etsy Store (http://www.etsy.com/shop/PartnersInCharms), we planned a photography day at Stef’s house. We had just received Cloud Dome’s newest creation – a Universal Disc for the Cloud Dome that was especially made for the original Cloud Dome and a Disc designed especially for working with just smartphones– and were anxious for a chance to see how it worked.

Remember that neither of us is anywhere near being a professional photographer and so that is the beauty of the iPhone/iPad used in connection with the Cloud Dome equipment – you can get good results being a total rookie!

Since we knew we were going to go at it intensely this is how we set up:

Equipment:
Large table that we could easily move around
iPhone 4s
iPhone 5
iPad Air
2 Nimbus Cloud Domes for Smartphones (we each have one which was very helpful)
Nimbus Large Earring and Necklace Stand
Nimbus Dome Photography Base
Nimbus Cradle with Tripod mount
Cloud Dome
Universal Disc for Cloud Dome
Background Pad
Lighting
Trays of jewelry separated by type to photograph
Empty trays to put jewelry pieces in after they had been shot
Props and display pieces
Small piece of white or neutral color polymer clay or museum clay
Basic jewelry tools
Pop can (more on this later)
Cloud Dome box (more on this later, as well!)
Snacks and drinks!

We set the table up so that we could both shoot at the same time. Since we had divided the jewelry into types – rings, bracelets, necklaces and earrings--we set up two stations to photograph.

Setting up the table with lights, Cloud Dome equipment and jewelry organized by type into trays. Oh, and of course coffee and pop to keep us going!

I took pictures of earrings, while Stefanie worked on taking images of bracelets and rings.

Stefanie attaching her iPhone to the Nimbus Cloud Dome

Setting up the Nimbus Cloud with the Nimbus Large Earring and Necklace Stand. The iPhone goes into the elastic triangle band to hold it in place, but I needed it to take this photo!

Once all those smaller jewelry items were shot, we worked together on the larger necklaces, with Stef doing the camera work while I removed and replaced product tags.

Stefanie arranging necklace on Cloud Dome Background Pad.
Taking picture using the new SmartPhone attachment for the Cloud Dome. Love it!!!
Here we are using our iPad and the Universal Disc for the Cloud Dome. This is great but we really found it was much easier to use the iPhone which also has a better camera.

Altogether we probably put in about 8 hours of work, taking about 300 pictures of approximately 125 pieces of jewelry! Incredible!!!

Good news is that we got that much done. Bad news is that now we have to edit the images in Camera+ and PhotoShop Touch and write great descriptions to post them to Etsy (http://www.etsy.com/shop/PartnersInCharms)!


Some images that we have edited and are up on our Partners in Charms Etsy store: http://www.etsy.com/shop/PartnersInCharms

Be sure to watch for Part Two of Lights! iPhones! Jewelry! where we will share some of the time and energy-saving tips we learned from this fun experience!

We want to thank Cindy Lichfield, Cloud Dome inventor, for all of her fabulous support! You can contact her at: http://www.clouddome.com/store/contactus.html

Happy beading!


Kathy and Stef

Friday, February 28, 2014

No More Hoarding!


The nippy weather has made us stay inside and gaze at all the gorgeous beads and findings that we have accumulated over the last 10 years of jewelry making. So many beautiful designs created and even more to come, but the reality of it all is that we have way too much stuff! The pictures our just a very, small part of Kathy’s stash, so you get an idea of how bad it has gotten!!!
 
Just a small part of the shelves of beads, findings, and tools at Kathy's house.


We adore lampwork beads – but hundreds of them kind of puts us into the realm of hoarders. Vintaj and Nunn Design marvelous metals are now taking up about 10 boxes between us! We won’t even tell you how many seed bead tubes we have because it is rather embarrassing. The truth is we have never met a bead we didn’t love; but before they come to film us for the reality show, Hoarders, we have to get organized and let some of our darlings go to other good homes. So – drum roll, please – we have opened a second Etsy site called Partners In Charms Stash at http://www.etsy.com/shop/PICstash.

 
A peak inside the boxes! Top row, left to right: Red Czech glass flowers, Vintaj Arte Metal charms and findings, Lucite white and green flowers and leaves. Bottom row left to right: Gunmetal beads and findings, shades of blue Swarovski crystals.

PIC Stash will be stocked with all kinds of fabulous beads and findings, most of which we have used in one or more of our creations. Better yet, you can get inspiration on how to use them by checking out our Partners In Charms Etsy shop http://www.etsy.com/shop/PartnersinCharms or on our Facebook page https://www.facebook.com/partnersincharms.
 
Okay, this is where it really gets scary - boxes of bags of beads that need
 to be sorted. There are a lot of them! Please help us with our addiction!!!

Check out our new shop at http://www.etsy.com/shop/PICstash

Happy beading!

Kathy and Stefanie
Partners In Charms